Important note: The Preview versions of the AVAIL Desktop 5.8 and AVAIL for Revit 5.8 must be installed together because they support Autodesk's upgrade to .NET 10.
Admins have access to download the Preview Release from the Manage Portal.
*** Reminder: Preview releases are not production-ready and are only available for select customers. We recommend installing the release for a limited group of users for internal testing.
Overview
It is important during the Preview Release to avoid impact on your production container files and AVAIL production channels.
AVAIL recommends the following workflow:
Step 1: Create a new Revit project
In Revit, use File>New>Project.
-
Can be hosted on ACC or your network drive.
Name the RVT file “AVAIL TEST CONTAINER.”
-
Do not copy or rename an existing Revit project or container file.
-
Do not do a save-as on an existing project or container file.
Step 2: Add Drafting Views to the project
From the AVAIL desktop, drag and drop, or load (without placing), 10 or more drafting views into the new Revit container file, AVAIL TEST CONTAINER.
Step 3: Create a Channel & Configure Your Harvest Settings
Do the following setup:
- Create a new AVAIL Channel to receive Harvest output from the test project.
- Create a new folder on your network to receive Harvest output from the test project.
-
Configure your Harvest Settings:
- Enable Harvest tracking under the Output tab.
- Customize which Elements you want visible in Harvest under the Elements tab.
- Enable the Related Content settings under the Export Options tab.
- Remember to Save Settings.

Step 4: Build a Harvest Queue, then Run Harvest
In your test container file, select some or all of the Drafting Views to add them to the Harvest queue.
Click Publish to run Harvest.
Please advise: Additional processing time will be needed the first time you enable Harvest tracking on your Container file.

Step 5: Load more Views into the Container File
Repeat the previous step, using AVAIL Desktop, drag and drop, or load (without placing), 10 more drafting views into AVAIL TEST CONTAINER.
Helpful tip: Notice in the Harvest panel, you now see both Published and Not Published drafting views. (see image above. Look just below the search bar)
Step 6: Edit a Drafting View in Revit and Mark as 'Ready to Publish'
In your test container file, open one of the published Drafting Views.- Double-click it in the Harvest panel to open it.
Make some graphical changes to the Drafting View.
Do a File>Save in Revit.
Click "View Activity" to see the Difference Engine notes reported in the Harvest panel.
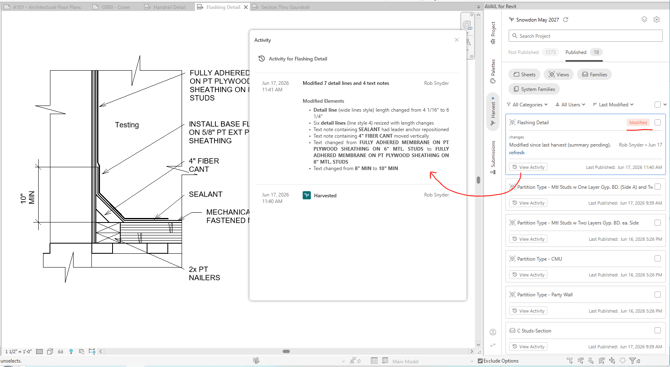
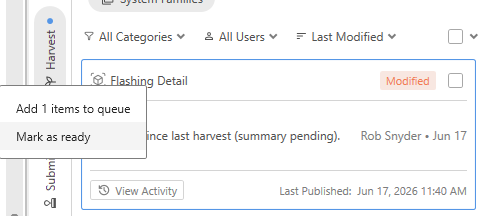
Right-click on the Drafting View in Harvest and select "Mark as ready."
Final Step: Publish a View that’s marked “Ready to Publish”
In AVAIL TEST CONTAINER, open the Harvest tab in AVAIL for Revit, find the Drafting Views marked as Ready to Publish.
Select the green checkbox to send the Drafting View(s) to the Harvest Queue.
Click Publish to run Harvest.

Also in Preview! Learn about AVAIL's Content Submission workflow in this article.