AVAIL Desktop 5.8 and AVAIL for Revit 5.8 must be installed together because they support Autodesk's upgrade to .NET 10.
It is important during the Alpha Release to test in a way that avoids impact on your production container files and AVAIL channels in use.
Follow these steps to avoid it:
Install Alpha Release AVAIL software
Download here: https://app.getavail.com/preview
Only within your design technology management team, please install:
Alpha Release AVAIL Desktop - v5.8
Alpha Release AVAIL for Revit - v5.8
Create a new Revit project
1. Create a new Revit Project for testing AVAIL for Revit 5.8
a. In Revit, use File>New>Project
-
-
- Can be on ACC, or anywhere
- Name the RVT file “AVAIL TEST CONTAINER”
- Do not copy and rename an existing Revit project or container file.
- Do not do a save-as on an existing project or container file.
-
Add drafting views into the project
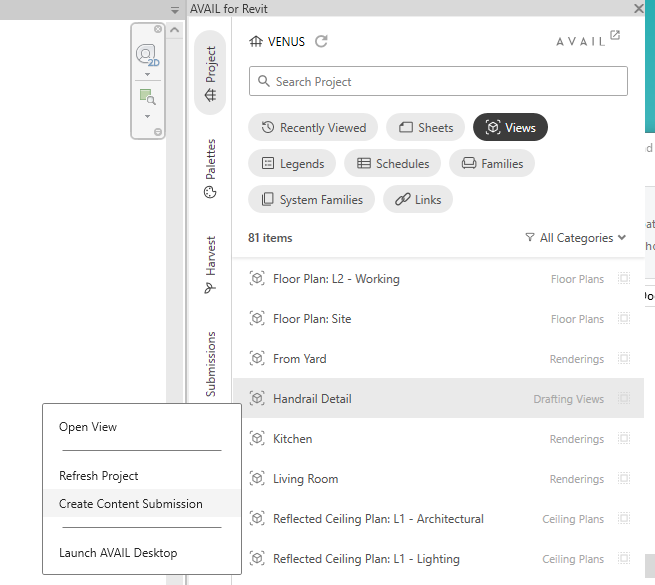
2. From AVAIL desktop, drag and drop, or load (without placing), 10 or more drafting views into the new Revit container file, AVAIL TEST CONTAINER.
Harvest Settings
3. Do the following setup:
-
- Create a new AVAIL channel to receive Harvest output from the test project.
- Create a new folder on your network to receive Harvest output from the test project.
4. Settings: in the Harvest panel, in AVAIL TEST CONTAINER:- on the second tab, Elements, select “Views” and deselect the other element types.
This narrows the focus of the rest of the Harvest panel only to Views, making Harvest easier to use. - on the first tab, Output, turn on “Turn Element Tracking ON”
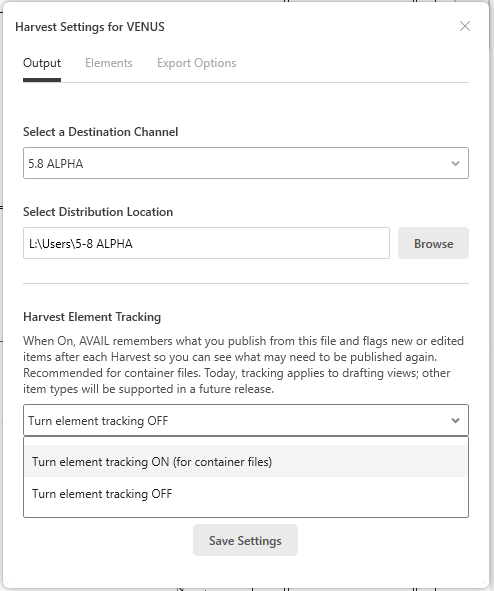
- Also on the first tab,
- choose the Channel you created in the step above, as the target channel for Harvest to publish to.
- Choose the network folder you created in the step above, as the target folder for Harvest to write to, to store the Harvest output on the network.
d. On the third tab, Export Options, set your intended settings.
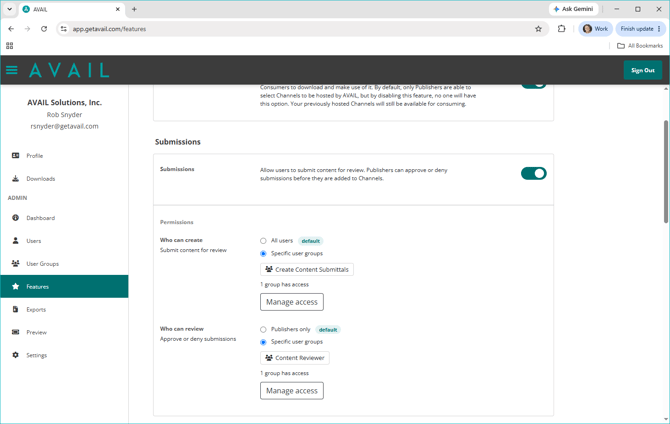
Set Roles for content submittal and review in the manage portal
5. Create User Groups for Submitter and Reviewer roles.
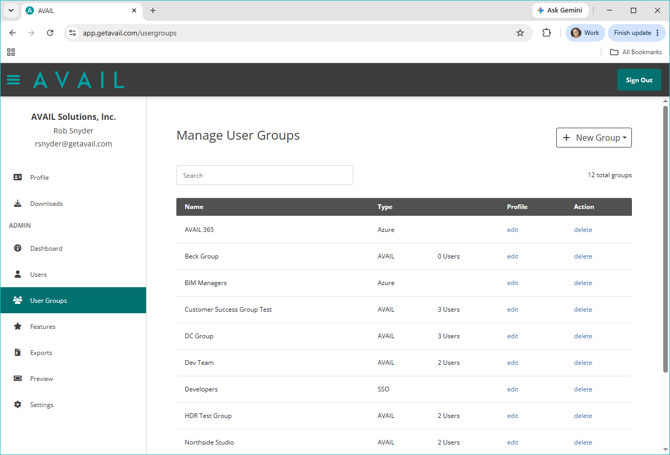
Then in the Features tab assign those groups to those roles:
Build a Harvest queue and Run it
6. In AVAIL TEST CONTAINER select some or all of the drafting views, that you loaded above (step 2), and add them to the Harvest queue.-
- Run Harvest

- Run Harvest
Load more views into the Container File
7. Repeat step 2 above, Using AVAIL desktop, drag and drop, or load (without placing), 10 more drafting views into AVAIL TEST CONTAINER.-
- Notice in the Harvest panel you now see both published and not published drafting views. (see image above. Look just below the search bar)
- Notice in the Harvest panel you now see both published and not published drafting views. (see image above. Look just below the search bar)
Edit an already-published drafting view
8. In AVAIL TEST CONTAINER, open one of the Published drafting views.-
- Double click it in the Harvest panel to open it.
- 10. Do a File>Save in Revit
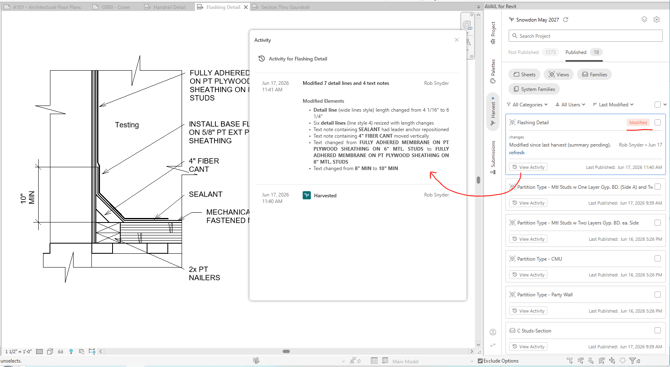
- 11. Notice the changes (diffs) are reported in the Harvest panel. Click "View Activity"
(Consumer) Submit content for Review and Publishing
12. As a consumer user:-
- Open an active Revit Project (not the test container file)
- browse in the AVAIL for Revit Project panel for all content that exists in the Revit file.
- select any content
- try a family and a drafting view
- In the AVAIL for Revit Project panel, right-click on the content and choose “Submit for Review”
(Reviewer) Work on and mark a View as “Ready to Publish”
13. In AVAIL TEST CONTAINER, open one of the Published drafting views again, the same one you edited previously in step 9 above...-
- Double click it in the Harvest panel to open it.
- 15. Do a File>Save in Revit
- 16. Notice the changes are reported in the Harvest panel
- Right click on the drafting view in Harvest and "Mark as ready"
- Right click on the drafting view in Harvest and "Mark as ready"
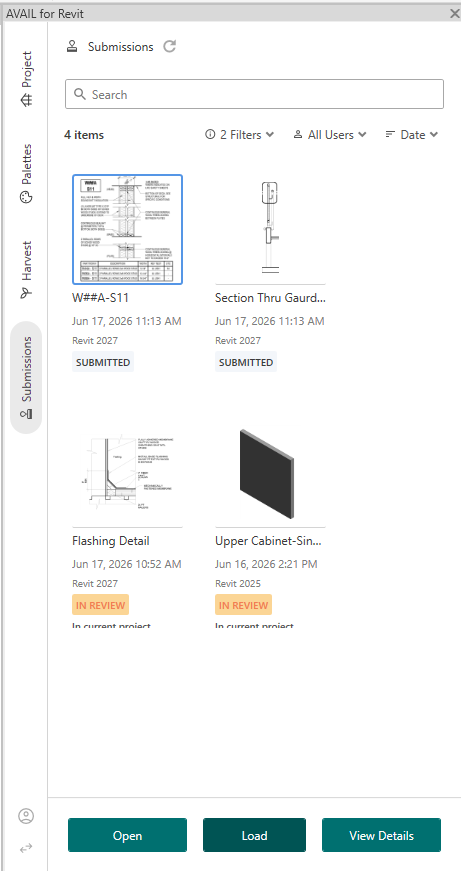
(Reviewer) Work on a newly submitted view, and mark it as “Ready to Publish”
17. In AVAIL TEST CONTAINER, click on the Submittals tab in AVAIL for Revit.
18. Find the drafting view submitted for review by a consumer in Step 12 above.
19. Click the green LOAD button to load the submittal in AVAIL TEST CONTAINER.
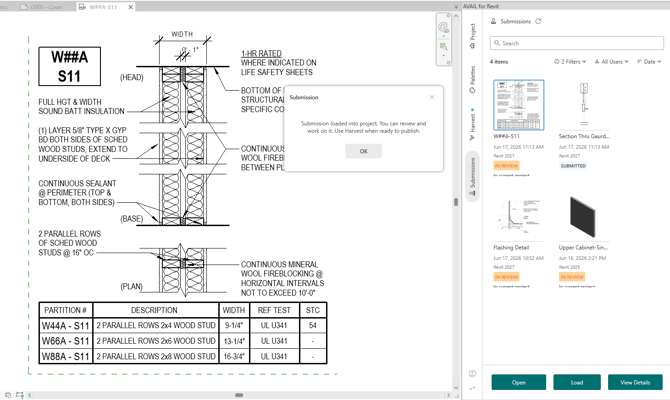
20. The Drafting View is loaded. An information dialog says you can review, edit, and harvest when ready. If you close the drafting view tab, return to it later either in the Harvest or Project tab of AVAIL for Revit. Double click the drafting view to open it for editing.
21. Make some edits.
- 22. Do a File>Save in Revit
- 23. Notice the changes (diffs) are reported in the Harvest panel
-
- Right click on the drafting view in Harvest and "Mark as ready"
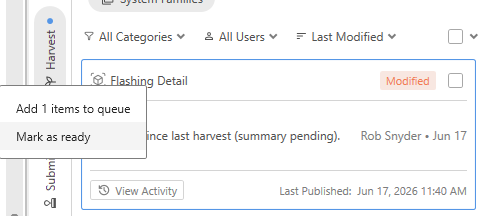
- Right click on the drafting view in Harvest and "Mark as ready"
(Publisher) Publish a view that’s marked “Ready to Publish”
24. In AVAIL TEST CONTAINER, open the Harvest tab in AVAIL for Revit
25. Find the drafting views marked as Ready to Publish (from steps 16 and 23)
26. Click the green check to send the drafting views to the Harvest queue.
27. Harvest them.