FAQ: How do I create a Palette?
FAQ: How do I share a palette with a team member?
What are Palettes?
Palettes in Avail are a simple yet powerful way to organize and collaborate on project content.
Users can easily create new palettes, name them for clarity, and add content from any channel through right-click actions. Multiple items can be added at once for faster setup.
Palettes also support team collaboration. By managing users, team members can gain edit access, enabling them to modify or delete palette content as needed. Importantly, these actions do not impact the original source content, ensuring data remains secure and organized.
By integrating palettes into daily workflows, teams can streamline content management, improve communication, and increase productivity across projects.
Video Outline:
- Creating a Palette
- Adding Content to a Palette
- Remove Content from a Palette
- Share a Palette
- Navigate to source Channel from a Palette
- Delete a Palette
Creating a Palette
- Click the + button located next to the Palettes option in the upper-left of AVAIL
or - Navigate to the Palettes page and click “New Palette.”
- Then enter a name and (optional) a description.


Adding Content to a Palette
- Open a channel and select your desired content.
- Right-click and choose Add to Palette:

- Choose an existing palette or create a new one during this process.

- Multiple pieces of content can also be selected and added to a palette simultaneously, saving time.
Please advise: Palettes are limited to a maximum of 200 items.
Important note: Searching is disabled on the Palettes screen by default. However, you can sort palettes by Creator, Palette Name, or Date Created to find your content more easily.
Remove Content from a Palette
- Navigate to the Palettes Menu, and open your Palette with a double-click:

- Right-click on the content, and choose Remove:

Share a Palette
Palettes can be shared with team members to support collaborative workflows.
To share:- Open the desired palette.
- Click “Manage Users.”
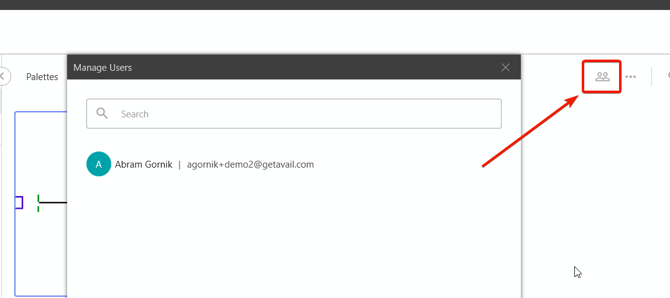
- Search for and add your team member’s name.
- When you add users, they are automatically granted edit privileges, which include the ability to:
-
Remove content from the palette.
-
Delete the entire palette if necessary
-
Navigate to the source Channel from a Palette
- Select an item in the Palette
- Select a Channel from the listed Channels in the bottom-right.

Delete a Palette
- Navigate to the Palettes menu.
- Right-click on your Palette and select Delete Palette
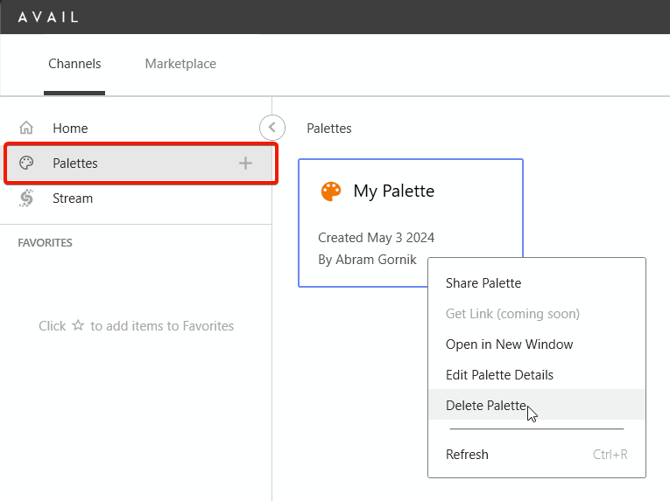
Caution: This will delete the Palette for all users. However, deleting a palette or its contents does not affect the source content in channels.
Key Takeaways:
-
Create a new palette to organize project resources.
-
Add content with a simple right-click and “Add to Palette.”
-
Share palettes with teammates using “Manage Users.”
-
Added users gain edit privileges automatically.
-
Deleting a palette does not delete source content.
-
Palettes promote collaboration, organization, and workflow efficiency.